I have made images with trees in the past, but I have never been satisfied with the appearance of the trees. Trees are relatively easy to create in POV-Ray through the use of recursive macros, but to make them really look organic is difficult. The first task in creating this scene was to convince myself that I could create impressive trees. I first tried Gena Obukhov's Povtree, but in the end decided that I would have an easier time coding the tree generation process myself. Nonetheless, the time I spent with Povtree gave me some ideas about how to go about making the trees look real.
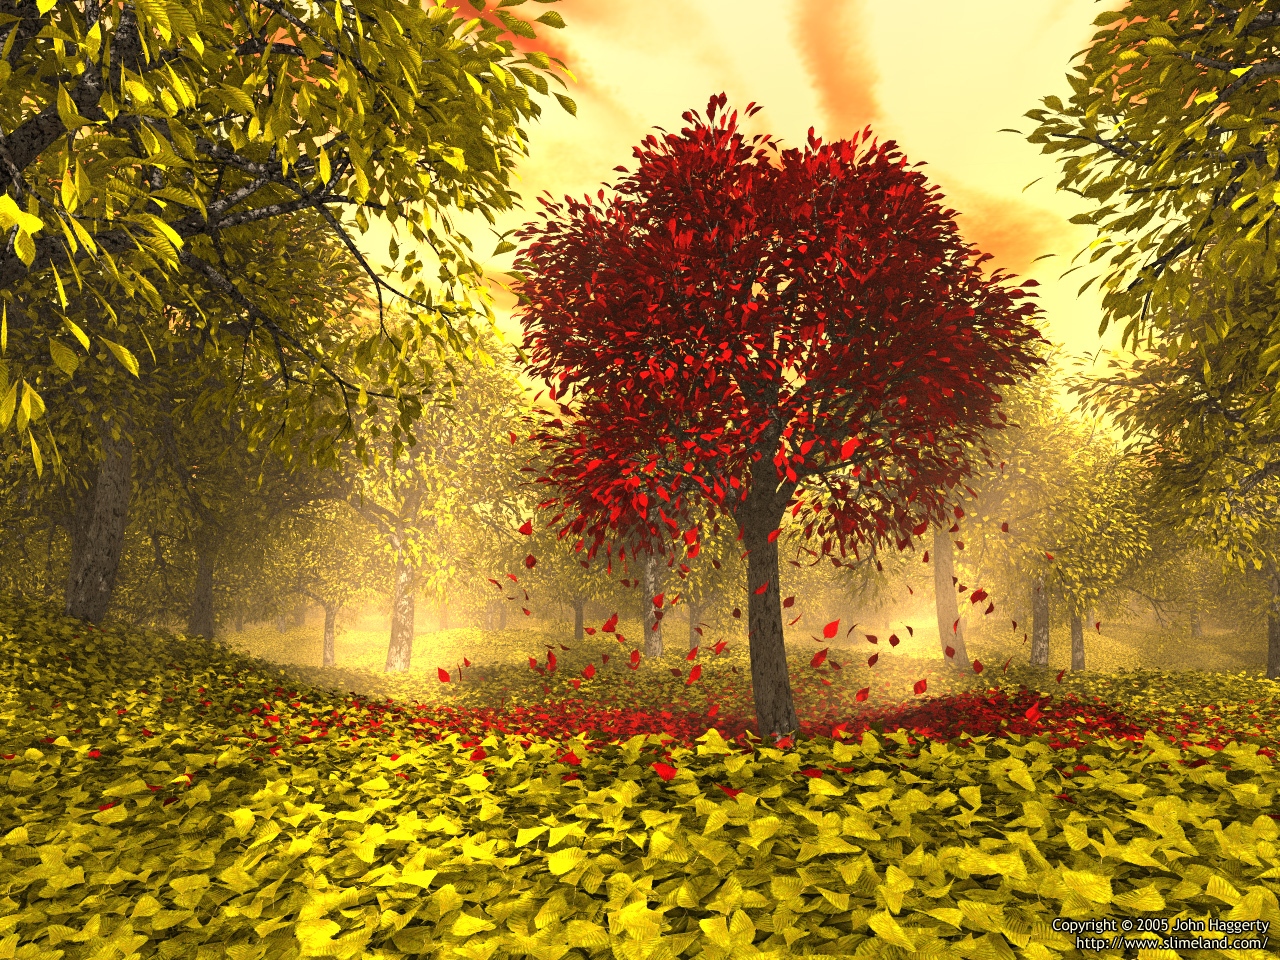
In the end, I had a tree generator that could take a number of parameters and output a triangle mesh which mostly resembled a leafless tree. I tweaked parameters quite a bit until eventually I had three trees to work with; these three trees make up the entire final scene: one is the red tree in the center, and the other two are repeated many times to make the yellow trees.
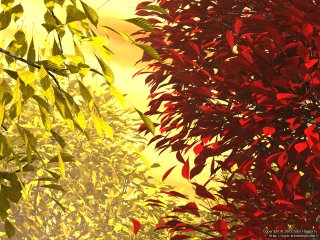
The next task was to find a leaf. I went outside and spent a couple of minutes choosing a good leaf to use; it was late Autumn at this point and most of the leaves on the ground were drying up, but I found one that was good enough. I scanned it and spent a matter of hours cleaning up the image, cutting out the leaf shape, and getting the color right. I ended up with a high resolution leaf texture. Over the course of the image's creation, I went back to this texture more than once to refine it.
Since I didn't want the leaves to be flat, I created a simple triangle mesh by hand in POV-Ray, shaped somewhat like a Pringle, and UV-mapped the leaf image onto it. Later on I would come back and separate the leaf texture into a pigment and a normal (bump) map to improve the appearance of the leaves under lighting. The red leaf texture is the same as the yellow leaf texture with a simple hue change.
I placed the leaves on the ground before placing them on the trees. The ground is just a repeatable height field created in Photoshop. Using the trace() function, I "dropped" leaves on the ground one at a time, in three layers, saving only the ones which were visible from the camera's position. This process took about half an hour each time I ran it. The leaves are more dense in the foreground than in the background, but overall there are 108,771 leaves on the ground alone. Still, there were cracks between the leaves where you could see the plain height field underneath. I solved this problem by putting a repeatable texture on the height field that looks like flat leaves piled on the ground. This creates the illusion that the leaves are completely covering the ground.
Placing leaves on the trees was simpler. For the tip of every branch of a tree, I placed 20 leaves in the general area of the branch tip. This created trees which were dense enough to use in the scene. As the detail images show, this caused some leaves to hover in the air near a branch rather than be attached, but since this isn't noticeable at any reasonable scale, I didn't mind.
The trunk texture is a procedural texture that I created by combining different scales of the granite and wrinkle patterns with the use of functions. I colored it based on an image of bark that I found online. The texture is stretched vertically for the trunks of the trees, and fades into a non-scaled version for the branches. I was very happy with the original trunk texture, but since it was heavily reliant on its normal, it looked very poor in shadows. I spent a lot of time trying to make it look good in shadow (and even turned on normal interaction with radiosity), but even the final version doesn't do justice to the original when it's not under direct light.
At this point I had the primary elements of the scene and was ready to put it together. The background yellow trees were placed randomly. All of the nearby trees were placed by hand to create the look I wanted. Some trees were placed off-screen to make shadows in the right places. The closest trees, only visible at the upper corners of the image, were toughest to place. I needed them to frame the image, but it was difficult to keep them from blocking important parts. In the end, I found positions that I was happy with for every nearby tree.
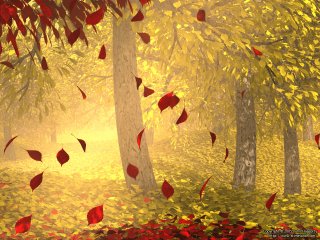
I turned the leaves near the base of the red tree into red leaves to make it look like they had fallen from it. I then placed leaves in the air everywhere. I found that these were too distracting and got in the way no matter how I tried to control their positions, so I decided that only the red tree would have leaves falling from it. Besides, I think it worked better that way artistically. The leaves falling from the red tree are partially randomly oriented, but to some extent they were pointed so that they swirl around it.
The sky was necessary to fill in the areas of the background that were not blocked by leaves. The original sky texture was a simple red-to-yellow noise-based pigment with turbulence and scaling to make it look like streaked clouds. I came back to it later and put more work into it, using scattering media to give the clouds some shape and depth. I also made them more turbulent on a small scale.
The scene had so many tiny shadowed areas from all the leaves that radiosity was a necessity. I spent a long time getting the radiosity settings right, but the end result is easily twice as appealing as the image is without radiosity. Two rendering passes were used; the first collected radiosity data with low quality settings (no area lights, no media, no anti-aliasing) and the second loaded the radiosity data and rendered the final image.
The final touch was fog. I wanted subtle beams of light to shine down from the top of the trees, but the render time was already fairly long at this point and I wanted to keep it from getting any slower. I ended up creating a black and white shadow "map" from an overhead view of the scene, which I used as a density for the media to control where the light appeared. This enabled me to use absorption and emission media rather than scattering, which is significantly faster, though less accurate. The loss of accuracy was fine with me since I wanted soft results anyway. I spent a lot of time tweaking the media settings and getting it to look just right. I think it gives the scene an extra touch of realism and makes it look like the air is cold, as it should be.
I had considered adding extra elements to the scene, such as a person (maybe a child), but in the end gave those ideas up since I was happy with the image as it was. I spent about a week working on the media, radiosity, and textures to get them just the way I wanted them, making subtle changes and doing full-scale renders to compare side-by-side. Although all POV-artists know that an image is never truly complete, I am very satisfied with the "final" result that you see.
The radiosity pass of the final render took 3 hours, 59 minutes and 28 seconds to render at about 86 pixels per second. The final render took 21 hours, 46 minutes and 45 seconds at about 16 pixels per second.